


What problem Docker solves?
You've probably heard this many times in software development: It works on my machine.
Docker solves this problem of it works on my machine. When developers create software, it often runs smoothly on their computer during development, but when they try to move it to a different environment, such as a server or a colleague's machine, issues can arise. This happens because the software might depend on specific settings, libraries, or configurations that are different on other machines.
Docker provides a solution by allowing developers to package their applications along with all the dependencies, libraries, and configurations into a standardized container. This container can then be easily moved and run consistently across different environments, ensuring that the application behaves the same way everywhere. It simplifies the process of software deployment, making it more reliable and efficient.
What is Docker?
Docker is a platform that enables developers to build, package, and distribute applications as lightweight, portable containers. These containers can run consistently across various environments, ensuring that the application behaves the same way regardless of where it's deployed.
Why is Docker important in the world of software development?
Docker simplifies the process of software development by allowing developers to bundle their applications and dependencies into containers. These containers encapsulate everything needed for the application to run, making it easy to deploy and run the same application on different machines or servers. Docker also promotes consistency across development, testing, and production environments, reducing the "it works on my machine" problem. It enhances collaboration among team members and facilitates efficient scaling and deployment of applications.
Containerization
Imagine a shipping container – those large, standardized metal boxes you see on cargo ships and trucks. This container is a self-contained unit that holds various goods.
In the same way, a software container is like a digital version of this shipping container. It packs up an application and everything it needs to run – the code, libraries, and dependencies. This digital container ensures that the application can be easily transported and deployed on different systems, just like the physical shipping container makes it simple to move goods between ships, trucks, and trains. The application inside the container runs consistently, regardless of where it's placed, making it practical and efficient for software development and deployment.
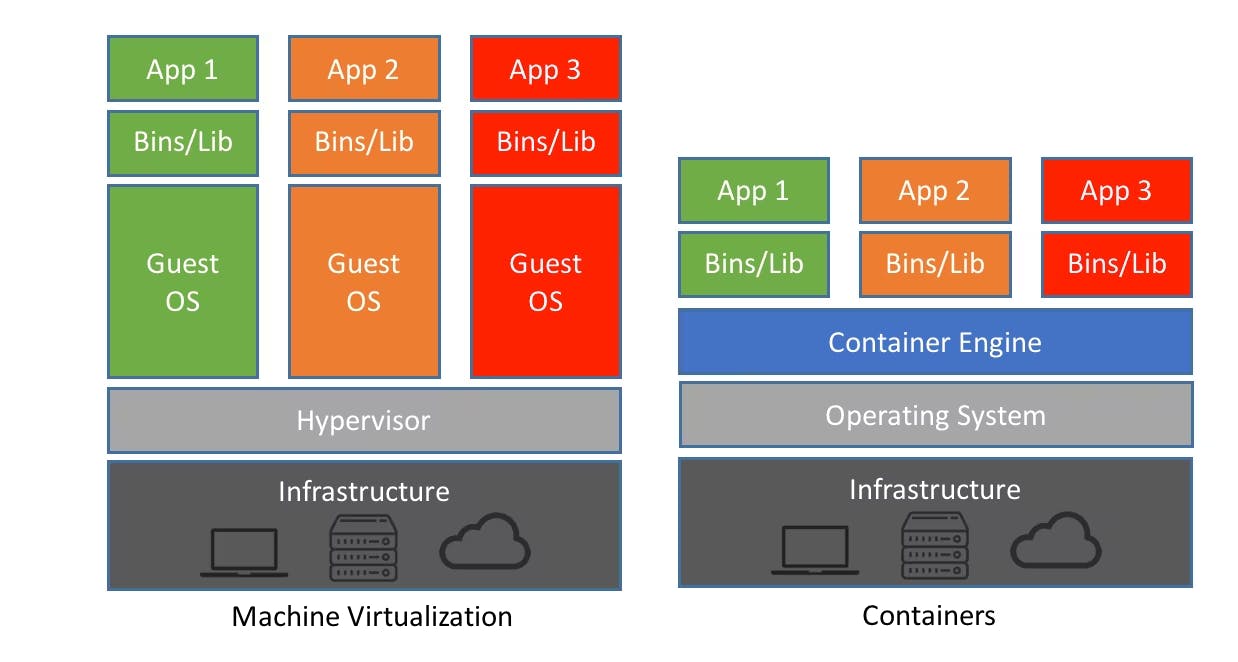
How containers differ from virtual machines
Real-world Analogy: Running a Café
1. Traditional Approach (Virtual Machines):
Imagine you're running a café, and each dish is prepared in its own fully equipped kitchen (virtual machine). These kitchens (VMs) are separate and have everything needed for cooking – stove, utensils, and ingredients.
Now, if you want to add a new dish (application) to your menu, you need to set up an entirely new kitchen (VM) for it. This can be resource-intensive because each kitchen runs its own operating system.
2. Container Approach:
Containers are like having a versatile food truck. The food truck (container) comes with its own kitchen, but it shares the main resources like the stove, water supply, and utensils with other food trucks (containers).
When you want to add a new dish (application), you simply use another section of the food truck (container) with its specific ingredients. It's like having different compartments for different dishes but sharing the overall kitchen space efficiently.
In Software Terms:
Virtual Machines (VMs):
- Each VM is a full-fledged kitchen (with its operating system) for one dish (application). This can be resource-heavy as it duplicates the entire setup for each dish.
Containers:
- Containers are like dedicated cooking stations within a shared kitchen. Each container has only what's needed for a specific dish (application), sharing the common resources efficiently.
Installing Docker on Different Operating Systems:
Windows:
Go to the Docker website and download the Docker Desktop for Windows.
Run the installer and follow the on-screen instructions.
Docker Desktop will prompt you to enable Hyper-V. Allow this as it's essential for running containers on Windows.
Once the installation is complete, Docker will start automatically.
macOS:
Visit the Docker website and download Docker Desktop for Mac.
Open the downloaded .dmg file and drag the Docker icon to your Applications folder.
Run Docker from Applications. It may ask for your system password during installation.
Docker Desktop will launch when the installation is done.
Linux:
Docker can be installed on various Linux distributions. Check your distribution's documentation for specific instructions.
On Ubuntu, you can use the following commands:
  sudo apt update
  sudo apt install docker.io
Start the Docker service:
sudo systemctl start dockerTo enable Docker to start on boot:
sudo systemctl enable dockerAdd your user to the
dockergroup to run Docker commands withoutsudo:sudo usermod -aG docker $USERLog out and log back in to apply the changes.
Docker Components:
1. Docker Engine:
- The Docker Engine is the heart of Docker. It's the construction site manager that oversees everything. Just as a construction manager handles building tasks, the Docker Engine manages containers. It takes your construction plans (Docker images) and turns them into a functional building (running containers).
2. Docker Hub:
- Docker Hub is like a blueprint library for builders. It's an online repository where you can find and share pre-made construction plans (Docker images). For instance, you can discover a blueprint for a WordPress website or a database server on Docker Hub.
3. Docker CLI (Command-Line Interface):
The Docker CLI is your toolkit control panel. Using simple commands, you communicate with the Docker Engine to execute construction tasks. For example:
docker run wordpressinstructs the Docker Engine to start building a WordPress website.docker stop container_idtells the Docker Engine to halt the construction of a specific container.
4. Docker Compose:
Docker Compose is like an architect's blueprint that lays out the entire construction plan for your project. It's a tool for defining and managing multi-container applications. With a simple
docker-compose.ymlfile, you can specify which containers to build, how they should connect, and their configurations. For example:yamlCopy codeversion: '3' services: web: image: nginx database: image: postgresRunning
docker-compose upwill start constructing both a web server (using the Nginx image) and a database (using the PostgreSQL image) according to your blueprint.
Example Scenario: Building a Website: Imagine you want to construct a website. You find a blueprint for a web server on Docker Hub. Using the Docker CLI, you run docker run -p 80:80 nginx to start building the web server. Now, anyone accessing your construction site (web browser) sees the website taking shape.
Later, you decide to add a database to your website. You create a Docker Compose file specifying both the web server and the database containers. Running docker-compose up constructs the entire project, with the web server and database connected as per your blueprint.
In this analogy, Docker components work together seamlessly to simplify the construction (deployment) of your project, just as a construction site manager, blueprint library, toolkit control panel, and architect's plan collaborate to build a physical structure.
Creating Your First Container:
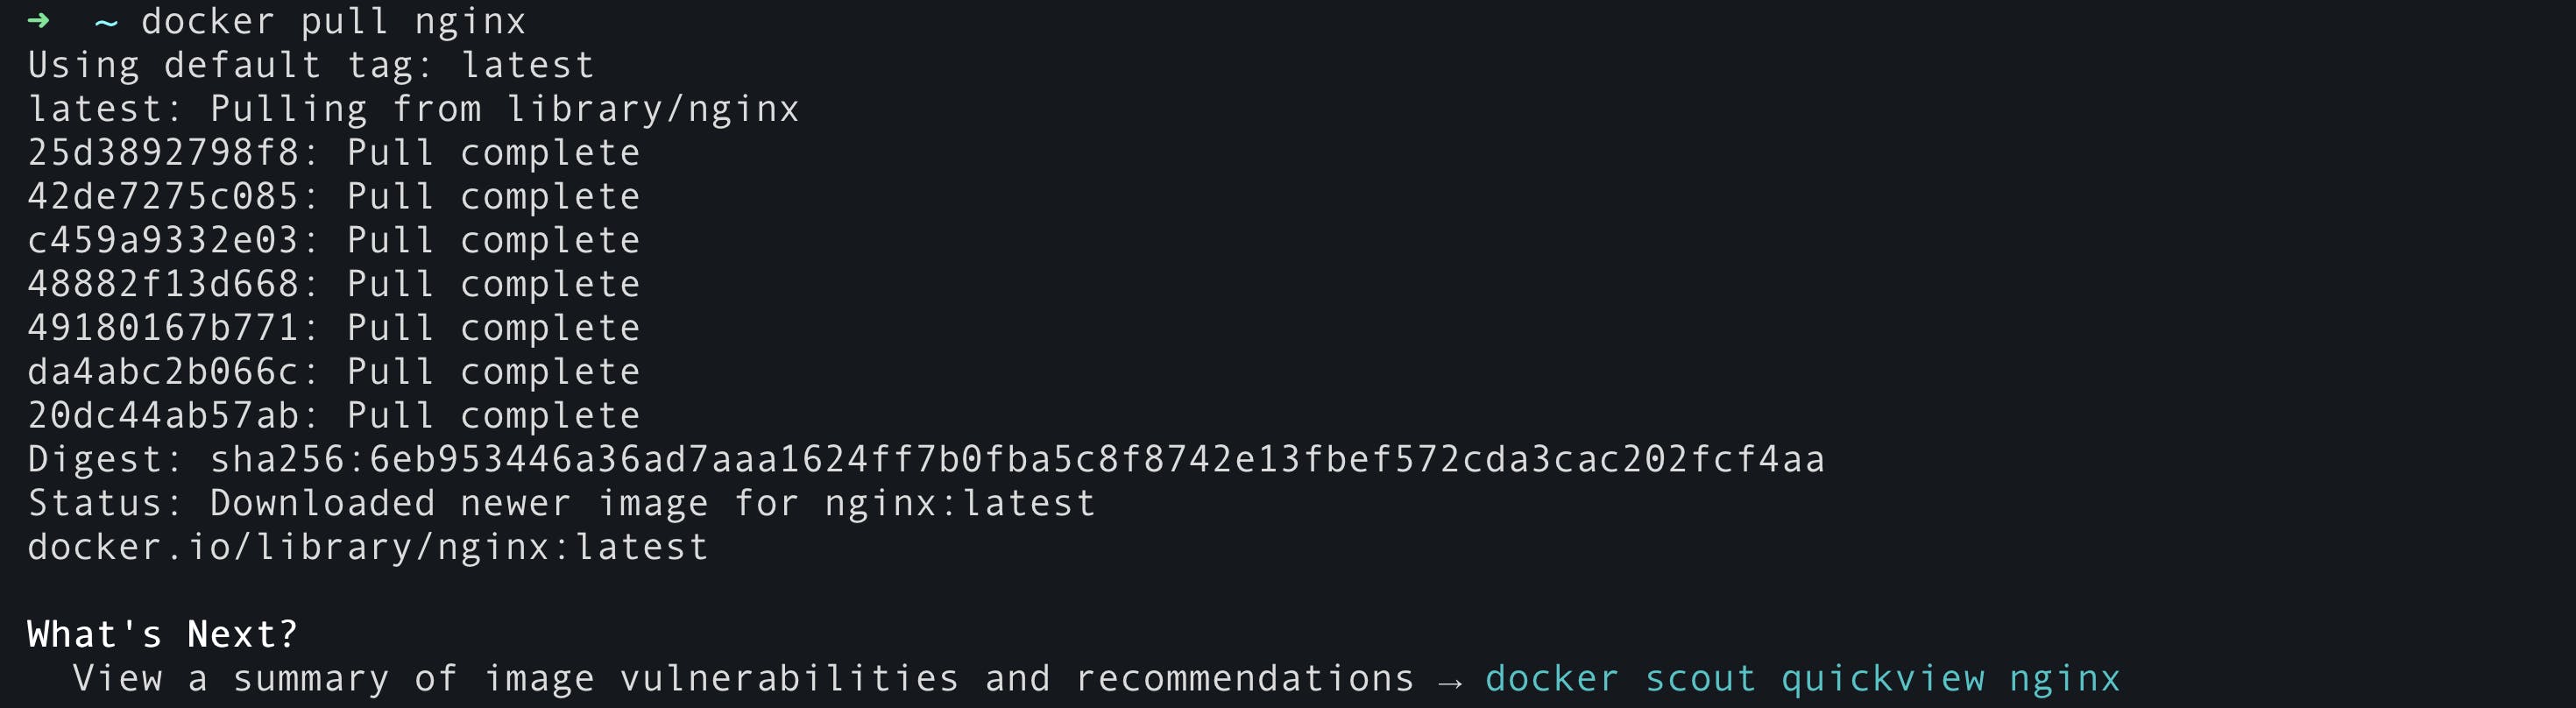
1. Pulling the Docker Image:
Open your terminal or command prompt.
Run the following command to pull the Nginx image from Docker Hub:
docker pull nginxThis command fetches the Nginx image from Docker Hub and stores it on your local machine.
Output:
2. Running a Container:
Now, let's run a container using the pulled Nginx image:
docker run -d -p 8080:80 --name my-nginx nginxThe
-dflag runs the container in the background (detached mode).The
-p 8080:80flag maps port 8080 on your host machine to port 80 inside the container. This means you can access the web server athttp://localhost:8080.--name my-nginxassigns a custom name ("my-nginx") to your container for easy reference.Finally,
nginxspecifies the image to use.
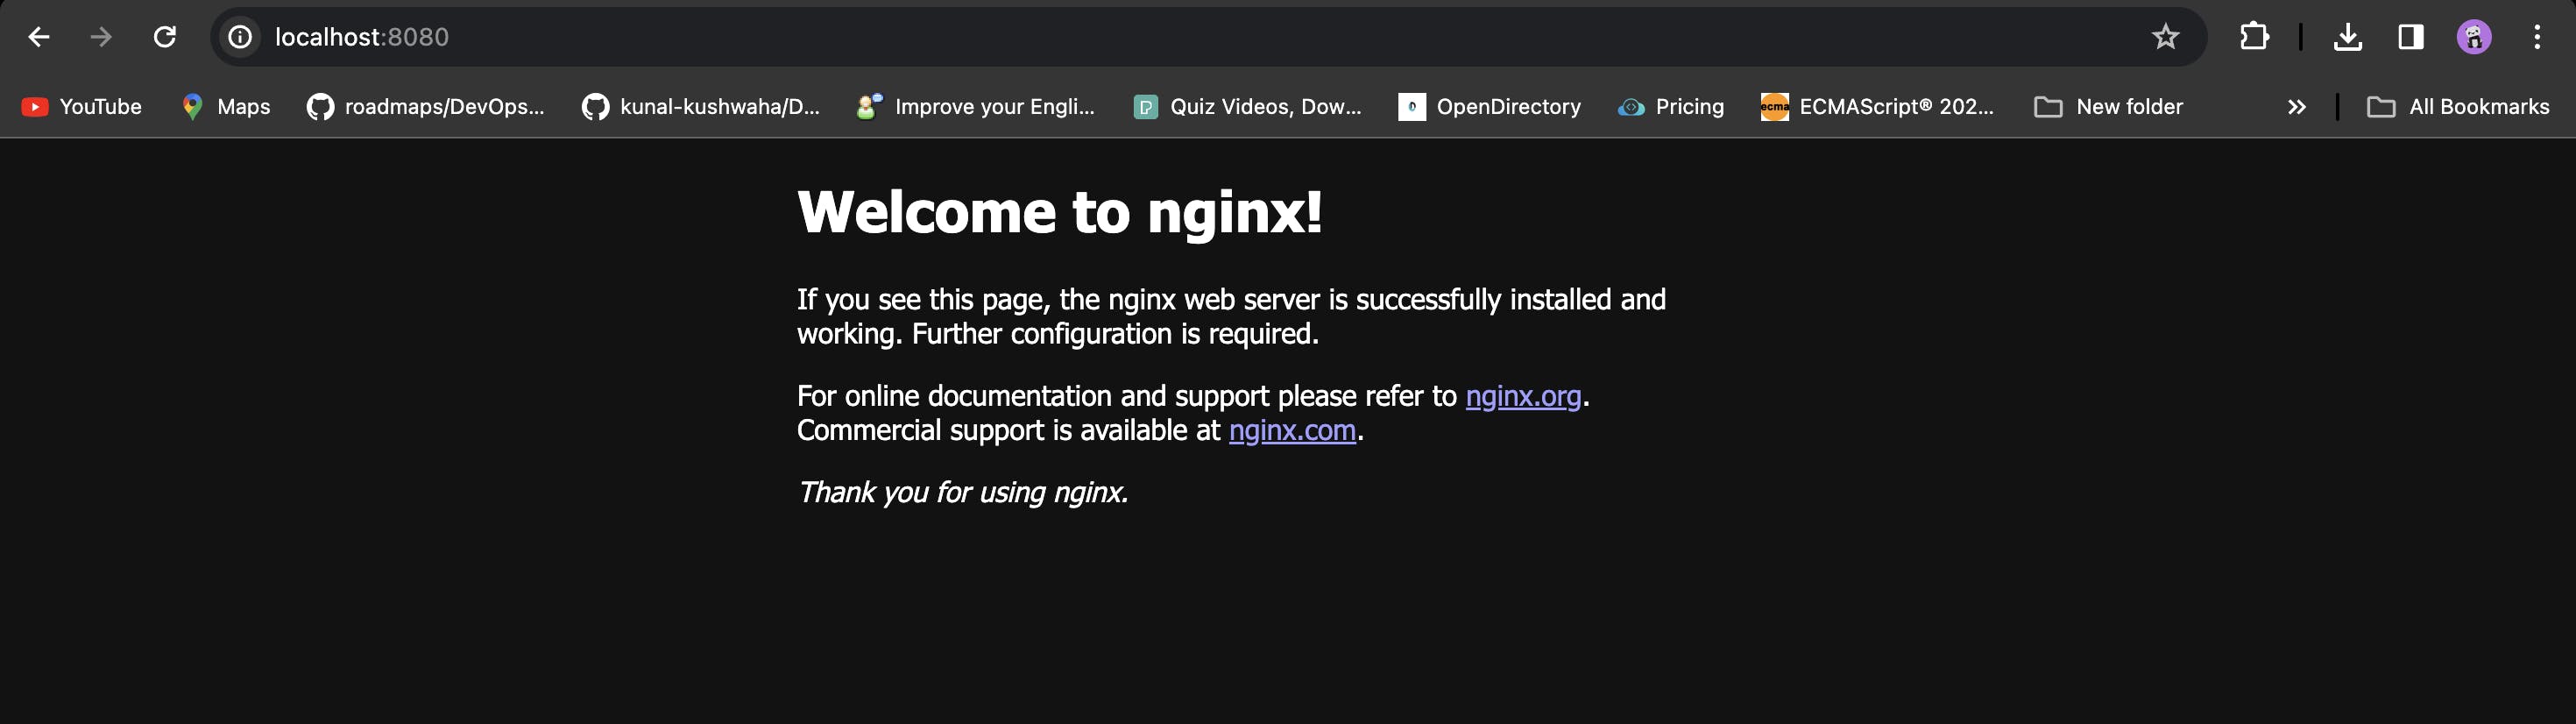
3. Accessing the Web Server:
Open your web browser and navigate to
http://localhost:8080.You should see the default Nginx welcome page, indicating that your containerized web server is up and running.
Explanation:
The
docker runcommand creates and starts a container based on the specified image.The
-dflag runs the container in the background, allowing you to continue using your terminal.The
-pflag maps ports between the host and the container. In this case, port 8080 on your machine is linked to port 80 in the container.--nameassigns a custom name to your container (optional but useful for identification).The last argument (
nginx) specifies the image to use for the container.
Basic Docker Dommands
1. Listing Running Containers:
To see which containers are currently running, use:
docker psThis command displays a list of running containers along with essential information such as container ID, names, ports, etc.
2. Stopping a Container:
If you want to stop a running container, use:
docker stop container_id_or_nameReplace
container_id_or_namewith the actual container ID or name.
3. Starting a Stopped Container:
To start a previously stopped container, use:
docker start container_id_or_name
4. Removing a Container:
If you want to remove a stopped container, use:
docker rm container_id_or_nameThis deletes the specified container, freeing up resources.
5. Viewing all Containers (including Stopped Ones):
To see all containers, including those that are stopped, use:
docker ps -a
6. Executing Commands Inside a Container:
You can run commands directly inside a running container. For example:
docker exec -it container_id_or_name /bin/bash- This opens a bash shell inside the specified container, allowing you to execute commands within its environment.
7. Viewing Docker Images:
To see a list of locally stored Docker images, use:
docker images
8. Removing a Docker Image:
If you want to remove a Docker image from your local machine, use:
docker rmi image_id_or_name- This deletes the specified image.
Let's try to delete the container we started earlier. Enter the command docker ps which displays the list of containers currently running. Then, check if our container is listed.

Now, to stop the running container, type docker stop container_id which, in our case, is b808fc6c742b, this will stop the container. You can check this by again using docker ps.

There are no containers running now to check stopped containers also you can use the -a flag, which will list all the containers

to restart the stopped container, you can use the docker start container_id command.

to delete the container, first, stop the container, and then type docker rm container_id this command will delete the stopped container.

Congratulations! Now you know how to spin up containers, but it's not everything about Docker. There are still lots of concepts remaining, which I will cover in my next blog. I will add the link for it soon.